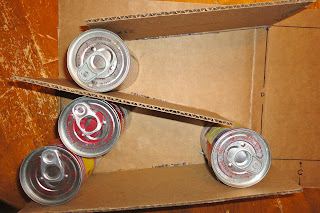
Can rotators are great tools for organization and space management. They allow you to store multiple cans containing the same food item in such a way that you use that cans with the most recent expiration date first. Here is a step-by-step picture tutorial for making you own can rotators out of a cardboard box.
Can Rotators Tutorial
Step 1: Collapse down your box so it is completely open and lays flat.
Step 2: Using a ruler, measure out each of the shelving pieces. Use the chart to determine the correct measurements for each piece depending on your can size.
Step 3: Cut out the pieces. We found using a utility knife was easier than using an Exact-o knife or scissors. Remember to put a spare piece of cardboard under whatever you are cutting to protect your table.
Step 4: When all the pieces are cut do a dry run with no glue to ensure they all fit together properly. Additionally, use your utility knife to score the creases for a cleaner fold in the “Back and Sides” piece.
Step 5: Label your pieces for ease of assembly. If you intend to make multiple can rotators now is a good time to use these pieces as templates and draw out more pieces without having to measure again.
Step 6: On the “Back and Sides” panel, measure and draw out the diagram for your can rotator using the chart to determine the correct measurements for each distance. Draw on the inside of the can rotator. You will be using the diagram as a guide for gluing. Double check your measurements by holding up a can and see if it fits through all you “A” and “B” openings.
Step 7: Dab glue along the “Lower Shelf”, “Center Shelf”, and “Upper Shelf” lines. If you are using a “Block” piece, also dab glue along the “Block” line.
Step 8: Position the “Lower Shelf”, “Center Shelf”, and “Upper Shelf” along the corresponding glue lines.
Step 9: Allow the glue time to dry until it is stable enough to hold the shelves. You can use cans to help hold up the shelves until the glue hardens.
Step 10: Apply glue to the opposite side and edges of the shelves. If you are using a “Block” piece, also dab glue along the opposite side and edge of the “Block” piece.
Step 11: Close the “Backs and Side” piece over the top like the cover of a book.
Step 12: Place a heavy object on top of the can rotator to help the box stay closed and the shelves stay in place. Allow the glue time to dry.
Step 13: Measure out where the “Upper Front” and “Lower Front” crease lines will go. Score with a utility knife and fold. Glue the “Upper Front” and “Lower Front” pieces in place. Allow the glue time to dry.
Step 14: Fill it with cans because you are FINISHED. If you want you can paint your can rotators or cover them with contact paper for a more uniform finish.


No comments:
Post a Comment